Wednesday, December 30, 2015

3D Hot Air Balloon!

Whether you are indoors or outdoors today, try making a 3D paper hot air balloon with the kids, they can display and celebrate it after! Oh, and don't forget the hot chocolate even if you are not going outside today.

Here is the link to the website with detailed instructions: http://www.craftymorning.com/spinning-3d-hot-air-balloon-craft-for-kids-to-make/. Have fun!

Saturday, December 12, 2015

Christmas Trees!

Good Morning! Are you and your  little ones feeling the holiday spirit yet? I am!

With that in mind, have the kids try to make Christmas trees from pine cones as decorations, ornaments, or gifts. We actually did a different pine cone craft here last weekend, people made snowy owls. You can check that out here if you missed it: https://artexperiencesfortots.wordpress.com/2010/12/20/this-is-a-craft-snowy-owl/. They are really cute, and my sister hates that my mom loves them. Crafty sister for the win!

The Christmas trees are a bit of a process, because you need to wait for the paint and Plaster of Paris to dry before you can glue on the beads. Otherwise, this is a neat craft that they can decorate any way that they want. I am excited to make some of my own later, I cannot remember the last time I used Plaster of Paris if at all. Here is the link with detailed instructions: http://elementaryartfun.blogspot.ie/2012/12/making-trees.html. Have fun, see you next week!

Friday, December 4, 2015

Puffy Paint: Snow Edition!

Today's craft is... Puffy paint! Only this is a special kind of puffy paint, it involves iridescent glitter to give it a real snow feel!

Here is the link with detailed instructions: http://www.growingajeweledrose.com/2013/11/shivery-snow-paint-recipe.html. The creator of this blog used peppermint extract, which is entirely optional.  I believe you have to use a more sturdy paper type like cardboard or watercolor paper. Or any paper that will not be ruined by moisture.

Have fun and see you next week!

Saturday, November 28, 2015

It is about time to start breaking out the holiday music!


We made drums out of re-purposed duct tape rolls for our Make-It & Take-It craft program earlier this month, and making a flute to go with it would be pretty awesome!

Here is the link with instructions: http://www.babylovingmama.com/2013/01/homemade-straw-flute-inspired-by-pinterest-craft-tutorial.html.

Have fun, see you next week!

Friday, November 20, 2015

Star Wars: Yoda Craft

I am designating today as a Star Wars themed craft day, because Star Wars: Episode VII is a month away from coming out in theaters!

This is a slightly labor intensive craft that you can do with the kids, and they will have a blast playing with them after. Or if they won't, I will and then my pets will have to endure it [cue the maniacal laughter]. Because there is no better playmate than a embarrassed pet that you have forced into dressing up for the sake of play, said the vegetarian...

Here is the link with detailed instructions: http://www.thissimplehome.com/2014/10/yoda-ears-headband-craft-and-tutorial.html. Have fun and see you next week!

Saturday, November 14, 2015

Sandpaper Art Activity!

Here is a fun and inexpensive activity to do with the kids!

This is basically a sandpaper painting craft, but there are three different methods to choose from (my favorite is the first one)! Plus, you can cut the sandpaper to be whatever sizes you want, that way you can frame them later (if you are into framing your child's artwork).

Here is the link with detailed photo instructions: http://www.kidsplaybox.com/art-activities-for-kids-sand-paper-art13169/. Have fun, see you next week!

Saturday, October 31, 2015

Halloween Printmaking!

Happy Halloween from everyone here at the Children's Room!

Today is also the last day of October, and I think that one more Halloween craft ought to be sufficiently appropriate before tomorrow (November 1st) is here.

On a side note: we have 8 weeks and 5 days left of this year already, just in case no one else has frightened you with that news yet!

Finally, today is going to be a printmaking craft day! Here is the link with detailed destructions, I mean instructions: http://tinkerlab.com/styrofoam-printmaking/. This might be a bit messy, but it is a really fun process that the kids will enjoy, and the clean up should be quick and easy enough! See you next week!

Saturday, October 24, 2015

Handprint Scarecrow!

I am trying to hold off on Halloween crafts for next Saturday, because it is going to be the 31st next week and I think waiting until then will be more appropriate!

In the meantime, try to make a hand printed scarecrow with the kids. Here is the link with detailed instructions: http://www.craftymorning.com/handprint-scarecrow-craft-kids-make/. You can make this however you want, and it makes for adorable decorations as well!

Saturday, October 17, 2015

Witch Fingers!

Do you have a stash of broken crayons taking up space in the house? Try re-purposing them with this fun craft using a witch fingers cookie pan. The crayons  look really cool when they melt together, and they are fun to color with when finished cooling! And my sources tell me that they can be found at Walmart or Michaels.

Here is the link with full instructions: http://creativeconnectionsforkids.com/2012/09/im-melting-witch-fingers/. I promise that this craft is in English this time!

Friday, October 9, 2015

Toilet Paper Roll Owls!

Want to make a cute and simple craft with the kids? Try making toilet paper roll owls!

After painting the roll whatever color you would like it to be (you don't have to pain it at all), the construction paper pieces are glued on from the bottom up, for each owl you will need:
  1. 1 heart shaped piece for the feet
  2. 14 little circles for the tummy (see photograph for how the maker laid theirs down)
  3. 1 triangle for the beak (fold in the middle about half way)
  4. 2 big white circles for eyeballs
  5. 2 smaller black circles for the eyes.
  6. Lastly, to make it seem like your owl is looking at something, you may poke a hole in the black circles or finish them off with a metallic silver sharpie. A regular silver sharpie might not show up as well.
Here is the link with photo instructions http://www.handmadekultur.de/projekte/eulen-aus-papierrollen_66189. Yes, it is in German, but I also found this craft on pinterest. Good luck and enjoy!

Saturday, October 3, 2015

Fall Mobile!

Do you want to try create another nature walk craft? This one should not involve any baking unless you plan on drying out your own fruit.

Here is the link for inspiration: https://www.facebook.com/ZartArtPBL?fref=photo. As far as I have researched, they are a business that sells art supplies and provides craft lessons somewhere in Australia. Thankfully, you do not need to make a special trip "down under" to make this!

Enjoy!

Friday, September 25, 2015

Nature Impressions!

It is time to go out for a nature walk, otherwise known as a hike, for some fun craft supplies!

Try making nature impressions using supplies from things found in nature. Polymer clay seems to be a favorite by everyone else who has done this, according to my research. To make the lines pop, you can apply a thin coat of acrylic paint.

Here is the link with detailed instructions: http://myplumpudding.blogspot.com/2008/03/nature-sculpture.html. Have fun and get creative!

Friday, September 18, 2015

Firework Painting!

Want to make something bright and fun with the kids? Why not try creating a firework painting?!

They will get to mix colors, play with straws, and have a blast making fireworks. Here is the link with detailed instructions: http://www.mykidsadventures.com/paint-fireworks/. This is a lengthy process because it involves painting on construction paper. If you want to expedite the process, I guess you could get a package of watercolor paper for a reasonable price and paint your background first, let that dry for a few minutes, and then start painting your fireworks.

If you do try this craft, please share with us how it turned out!

Saturday, September 12, 2015

Tissue Paper Apples!

We made these for our Make-It & Take-It drop-in craft program earlier today. Some people made rainbow apples (we put out blue and pink tissue paper too), which still looked really good!

The craft was inspired by this site: http://www.blissfulroots.com/2013/09/tissue-paper-apple-art-project.html?utm_source=feedburner&utm_medium=email&utm_campaign=Feed:+BlissfulRoots+%28BLISSFUL+ROOTS%29. So all you need is construction paper, tissue paper, and glue sticks. We also used brown crayons to color the stems. I think apart from gluing and piling on tissue paper, shredding and tearing the tissue paper was my favorite part!

Friday, September 4, 2015

Shoebox Foosball!

Why not try to make a miniature Foosball table with the kids that they can play with after?!

This craft should be pretty quick and inexpensive, and here is the link with detailed directions: http://www.u-createcrafts.com/diy-mini-foosball-tableperfect-for-kids/.

Have fun and enjoy!

Wednesday, September 2, 2015

Homemade Bubbles!

Try making homemade bubbles!

Here is the link with detailed instructions: http://myfrugaladventures.com/2013/06/30-days-to-a-funner-summer-how-to-make-giant-homemade-bubbles/.

I was at a birthday party recently, and I forgot how much fun it is to make and play with bubbles at any age! However, I have noticed that if you are using glycerin in your mixture the results are better if you let the recipe sit overnight (about 8-12 hours).

Enjoy!

Friday, August 21, 2015

Rainy Day Foam Dough!

Who wants to make and play with foam dough?!

Here is the link with photographic instructions: http://earlylearning.momtrusted.com/2013/05/foam-dough-shaving-cream-corn-starch/. There are no exact measurements listed, but it looks like they used a cup of cornstarch with a cup of shaving cream (don't quote me on that though).

I will probably be trying this later myself and let you know how it goes!

Enjoy!

September 4:
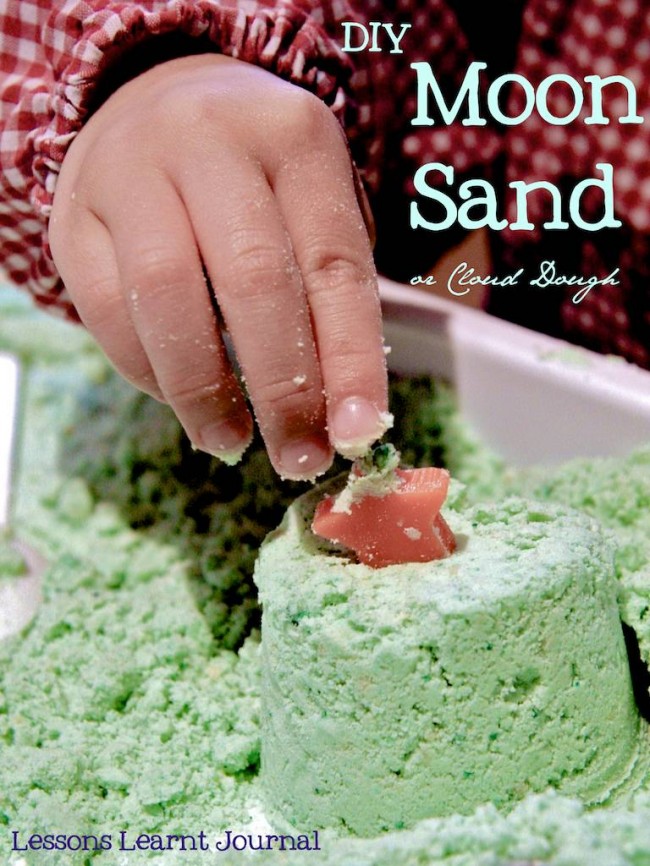
So here is my version of the foam dough, I discovered that it is the shaving cream that you need more of because it basically acts as a binder!

Measurements are as follows:
1/2 cup of corn starch
Roughly 1.5 cups of Barbasol
Several squirts of food coloring (optional)
1 large Popsicle stick or spoon to stir


Take 1 large measuring cup (they make great mixing bowls for small tasks) and measure out 1/2 cup of cornstarch. Then add Barbasol until it is just below the 2 cup line at the top. Spritz several drops of food coloring on top and then stir it until the mixture is blended. It is ready for play when it looks like moon sand, but feels like foam!

Good luck!


Friday, August 14, 2015

Paper Jellyfish!

I have not been able to find instructions for this craft, but I found it on this website which leads to another website, or rather a dead end. However the craft itself seems pretty straight forward!

You will need:
  • paper bowls for the head
  • construction paper for the eyes
  • a lot of ribbon and different kinds for the tentacles
  • markers or tissue paper for to color the tops of the head
  • glue
  • imagination for fun!
 I would start by decorating the head and gluing on the eyes first. When that is complete I would set it down on a flat surface like a table so the open side is facing up at you. Then I would glue on the ribbons and tissue paper and wait until it is done drying to flip it back over again to make it look like a jelly fish!

Good luck and enjoy!


Monday, August 10, 2015

Swatted Bug Painting!

Who wants to paint with a fly swatter instead of a paint brush or fingers and feet?!

This is the last bug related post as the summer reading program is officially over (as of this past Friday)!

So all you really needs here is some different colored paint, a fly swatter, and maybe bug stickers if finger painting bugs is too complex. Here is the link for detailed instructions: http://www.preschoolplaybook.com/search/label/bugs.

Enjoy!

Friday, July 31, 2015

Beaded Butterflies!

People have been asking about the beaded dragonflies above our desk lately, and here is tutorial on how to make them: http://www.scribd.com/doc/85987274/Beaded-Bugs.

This was originally posted about three years ago here on the Weekly Craft, I think. But these are too cute to not be re-posted!

Enjoy!

Friday, July 24, 2015

Firefly Bottle!

If you have been out in your yard at night for past couple of months you might have noticed fireflies are out and about blinking around!

Here is the link for inspiration: http://megduerksen.typepad.com/whatever/2012/09/we-heart-art.html. I say "inspiration" because this person's craft was made using the Kiwi Crate. If you do not know what that is, it is an organization that sells craft ideas and supplies for kids, and the package gets delivered wherever you decide to send it.You do not need a glass bottle, a regular clear plastic one should work just fine!

Enjoy!

Friday, July 17, 2015

Butterfly Footprints!

Today's craft is going to be butterfly footprints! Christina gave me this idea, and I really like messy crafts. Go team!

Here is the link for pictured instructions: http://www.mommypotamus.com/how-to-make-butterfly-footprint-art/. Enjoy!

Friday, July 10, 2015

Spoon Ants!

In case you missed it this past Wednesday morning, we had a drop-in craft program that involved making spoon ants! Ours looked very similar to these, only we used black spoons, black masking tape, black pipe cleaners, and small googly eyes!


Our instructions went as follows:

2 spoons
3 3-inch strips of black masking tape to hold the spoons together
3 pipe cleaners for legs 
2 googly eyes

Here is the link for the instructions that coincide with the picture above: http://www.survivingateacherssalary.com/ant-spoons-spring-bug-craft-for-kids/. Their method is a bit different, but both are basically the same. Enjoy!

Monday, July 6, 2015

Egg Carton Bumble Bee!

Here is another cute little craft to go along with our bug theme this summer! And here is the link for instructions: http://www.craftymorning.com/egg-carton-bumble-bee-craft-for-kids/.

Younger children will need help assembling and gluing pieces. Enjoy!

Friday, June 26, 2015

Slimy Slug Candy!

Today is the last day of the first week of Summer Reading Program! Already!

And with all of the creepy crawlers out and about, why not try making Slimy Slug Candies with the kids on a rainy day like this?

Here is the link with the recipe and photographed instructions: http://makingmemorieswithyourkids.com/2013/07/slimy-candy-slugs/.

Enjoy!

Thursday, June 18, 2015

Another Ocean Theme: Hand-painted Crabs!

This week's craft is going to be all about hand-painting and gluing oceanic scenes!

Here is the link for inspiration and full instructions: http://steffenatelyblessed.blogspot.com/2012/03/ocean-lesson.html. Enjoy!

Saturday, June 13, 2015

Fruity Pebbles Popsicles!

After doing some work in the children's garden this morning, a cold and sweet treat sounded phenomenal! Unfortunately, I did not plan ahead for such things. Shenanigans!

This is a pretty easy and equally quick treat to make with the kiddos today or any time this summer! Here's the link with instructions: http://www.wearenotmartha.com/2012/08/fruity-pebbles-greek-yogurt-popsicles/.

There are plenty of these recipes on the internet (Pinterest, so it seems) and if your child is allergic to the coloring in Fruity Pebbles, here is a safer and maybe yummier version: http://www.caramelpotatoes.com/2013/07/12/breakfast-popsicles/. It is essentially the same recipe, only they used actual fruit instead of fruity pebbles. Enjoy!

Friday, June 5, 2015

Moon Sand!

Since it seems like the weather is finally deciding to stay warmer, now is a good time to explore creating messy crafts outside again!

Why not try making Moon Sand with the kids? On all accounts, it feels like real sand, but is a bit easier to clean up. Plus, it is more cost effective than sandbox sand!

My inner child still loves playing in the dirt, even if it is fake dirt!

Here is the link with full instructions: http://lessonslearntjournal.com/d-i-y-moon-sand-or-cloud-dough/. Enjoy!

Saturday, May 30, 2015

Aquatic I Spy Jars!

Get outside and play because today's craft is going to be under water themed!

Here is the link with full instructions and inspiration: http://adventure-in-a-box.com/underwater-i-spy-jars/.

I am personally a huge fan of crafts that are meant to be played with, so this was a very quick and easy decision for me. Enjoy!

Saturday, May 23, 2015

Paper Cloud Mobile!

Make cloud mobiles with your kids!

Here is the link for full instructions: http://blog.hgtv.com/design/2013/05/07/weekday-crafternoon-diy-paper-cloud-mobile/. I am going to attempt to make my own today, so I will let you know how easy it was (or wasn't), and post pictures to prove it.

Enjoy!

Wednesday, May 20, 2015

Popsicle Stick Airplanes!

Today I am posting a Popsicle stick airplane craft to make up for the lack of craft posting this past weekend!

There are tons of Popsicle stick airplane crafts that involve already colored sticks, but today's posting is based off of this website: http://kidschaos.com/lolly-stick-bi-planes/.

Have fun and enjoy!

Friday, May 8, 2015

Paper Plate Porthole!

Let's try something a little different! Try making a paper plate porthole using miscellaneous materials around the house.

Here is the link with full instructions: http://craftsbyamanda.com/paper-plate-porthole/. Enjoy!

Saturday, May 2, 2015

Galaxy Slime!

This week's craft is galaxy slime! Because why not?!

Here is the link with detailed instructions: http://www.two-daloo.com/night-sky-activities-preschool-galaxy-slime-borax-free/?utm_source=feedburner&utm_medium=email&utm_campaign=Feed:+Twodaloo+%28Twodaloo%29.

Plus, it is not light sensitive so you can most certainly make this outside!

Enjoy!

Friday, April 24, 2015

Egg Carton Turtles!

It's turtle nesting season!  Until sometime in October, according to Sea Turtle Conservatory (their website: http://www.conserveturtles.org/florida.php?page=nestingseason). The last day has not been announced yet, sorry.

These are super adorable and really simple, and I'm sure you can create any design on the turtle shell that you want!

Here's the link for inspiration and full instructions: http://itsmunchkintime.blogspot.com/2013/09/easy-egg-carton-turtle-craft-for-kids.html. Enjoy!

Saturday, April 18, 2015

Marbleized Shaving Cream Drawing!

Kids can have a blast creating these beautiful drawings using shaving cream and liquid watercolor! And who doesn't love playing with shaving cream?

Here is the link with full instructions: http://www.elementaryartfun.blogspot.com/2010/11/marbleizing-with-shaving-cream.html. Enjoy!

Friday, April 10, 2015

Paper Bouquet!

Decorate for spring with this fun and easy craft!

Here is the link for inspiration and directions: http://krokotak.com/2015/02/spring-bouquet-2/. This would probably look just as adorable hanging up or suspended. Until next time!

Saturday, April 4, 2015

Easter "Egg" Potato Stamping!

Make an Easter painting or greeting card for your loved ones this Sunday using paint and potatoes!

This should be less messy than last week's craft, and the kids get to play with more food as well!

Here is the link for inspiration and full instructions: http://www.craftymorning.com/easter-egg-potato-stamping-craft-kids/.

Have fun and enjoy!

Friday, March 27, 2015

Pollock Inspired Painting!

I am on a painting kick this week so I thought I would share another painting craft with you!

This is a sensory craft that includes the use of your child's gross motor skills, and being able to throw paint is such a fun way to play!

Here is the link for full instructions: http://www.growingajeweledrose.com/2013/10/paint-filled-eggs-on-canvas.html.

I would strongly recommend wearing old clothes, and it might be easiest to make a small hole at the top using a butter knife. Like your trying to extract egg yolk to make a white cake or something... Enjoy!

Saturday, March 21, 2015

Fork Painted Tulips!

Looking for something more spring themed or colorful to make with the kids? Why not paint tulips using forks!?

These are attractive and simple, and the kids will have fun making a mess using the forks, I mean paint!This craft can also serve as a gift for a loved one as well: refrigerator art, wall art, etc.

Also, protective wear might be a necessity for this craft, especially with the little ones!

Here is the link for inspiration and full instructions: http://www.kidsplaybox.com/spring-art-tulip-painting/. Enjoy!

Friday, March 13, 2015

Inkblot T-shirt!


Here is a fun and colorful way to simultaneously teach your kids about symmetry and creativity that they can also wear!

The t-shirts are modeled after the Rorschach inkblot tests. The idea of this craft is that you and your child scatter colored drops of paint on a shirt, fold it in half, and open it back up to see the vibrant creation you have just made! The kids will learn about symmetry and why mixing colors produce new or different hues of color. Plus, it is also fun to re-purpose old t-shirts that are still in wearable condition!

If you do not have any fabric paint on hand, Joann Fabrics sells it for about $2-$10 depending on the bottle's brand. In my past experiences with fabric paint and iron on designs, it's best to let the material air dry after it has gone through the washing machine. This craft can get a little messy, and I strongly urge you to cover your clothes or wear old clothes because fabric paint will stain just about anything.

Here is the link for full instructions: http://www.elsiemarley.com/ink-blot-shirts.html, enjoy!

Saturday, March 7, 2015

Paper Shamrock Decorations!

Are you feeling the St. Patrick's Day spirit yet?!

Today for our monthly Make-It & Take-It program, we made treasure pouches from muslin fabric, sharpies, and rubbing alcohol! As a continuation of the St. Patrick's Day theme, here is a little more complex craft for you and your kids to try!

These really do look pretty awesome when they are completed and hanging up! Here is the link for the full instructions: http://www.sugarbeecrafts.com/2012/03/paper-strip-shamrocks.html#_a5y_p=1306343. If you do not have hot glue or staples, I'm sure you could substitute them with tape or something!

Friday, February 27, 2015

Balloon Inflation Experiment!

T.G.I.F. to you all and it seems like a perfect Friday for another science-themed craft!

This craft teaches kids simple science experiments using ingredients or supplies that already exist in the kitchen. I found this inspiration on http://www.sciencebob.com/experiments/fizzinflator.php, and the idea is to combine baking soda (sodium bicarbonate) and vinegar (acetic acid) to create carbon dioxide (CO2).

Also, there's less clean up compared to a homemade volcano! Good luck on your experimenting and have fun with it!

Friday, February 20, 2015

Paint Swatch Bookmark!

Do you happen to have spare paint swatches hiding in your junk drawer that you cannot see yourself parting with, but you do not know what to do with either?

If you do not have any on hand, don't worry because they are easy to get! So, try making this colorful upcycled bookmark craft that the kids will enjoy! You can find the image on The Crafty Blog Stalker.

Unfortunately, there are no instructions that I was able to find for you to follow, but all you really need to make these are a handful of your favorite colored paint swatches, some sharpies (preferably black), some ribbon or another decorative string, like yarn, that would look awesome too.

Get creative and have fun!

Friday, February 13, 2015

Lava Lamp!

Do you have extra materials left over from a baking or cooking experiment and don't know what to do for a simple yet fun craft with the kids? Why not try making a science themed lava lamp using just four ingredients from the kitchen?!

This is a pretty neat and simple science experiment that involves color and bubbles! I made one of these last year, and they really are easy to make but more fun to watch!

However, I do recommend using a jar or a bottle that has the ability to be more air tight than a peanut butter jar, because messes like to accompany most experiments without fail.

So, here is the link with full instructions: http://www.123homeschool4me.com/2014/05/fun-things-for-kids-make-lava-lamp.html?utm_source=feedburner&utm_medium=email&utm_campaign=Feed:+123homeschool4me/WkbE+%28123+Homeschool+4+Me%29&m=1

Have fun and enjoy!

Saturday, February 7, 2015

Valentine's Day Craft!

Try this out: paint a watercolor and wax resistant Valentine's Day card for your valentine! The water and wax resistant crafts are so much fun, and they create a minimal mess!

Click here to see the full instructions on how to create your own unique Valentine's Day card that your Valentine will surely love!

Happy Valentine's Day and see you next week!

Friday, January 30, 2015

Groundhog Day Cupcakes!

Happy Groundhog Day to all!

Hopefully, Mr. Punxsutawney Phil won't be seeing his shadow this coming Monday, and we will (hopefully) have an early spring! But perhaps Mother Nature will be in our favor since the forecast is saying that it is supposed to snow (don't take my word for it though).

In celebration of this tradition, here is a craft that you can play with and eat! If you or your child have food allergies, you can substitute any food item for something other (or healthier) than cupcakes. The main focus for this is the groundhog, which you can save to play with later!

Here are the complete instructions, groundhog printable included: http://lilyjanestationery.typepad.com/justlovely/2011/01/diy-groundhog-day-cupcakes.html

Friday, January 16, 2015

"Stained Glass" Paper Kites!


So, this is week two of inadvertently picking another paper themed craft! I apologize and I will try my best not to post the same theme back-to-back again... at least not for a while!

This craft is pretty simple, and it's okay if you don't have all the materials listed, which means you can always substitute it for something else!

I personally really like transparent or light-up crafts, and this one makes a quick and easy window decoration too!

The link for full instructions: http://www.makeandtakes.com/colorful-stained-glass-kites

Saturday, January 10, 2015

Paper Plate Characters!

Here is a cute idea: try making your favorite characters out of paper plates!

You can follow these directions to replicate Santa, Rudolph, or Frosty as they appear in the image, or create your own!

I bet it is also possible to make Olaf, an elf, and your favorite superhero too!

Here is the link again: http://kixcereal.com/kix-cereal-paper-plate-christmas-characters-santa-rudolph-snowman/. Have fun!